How to Create Scroll-Over Interactive Elements in WordPress: A Complete Guide to Boost User Engagement
Creating a website that stands out and engages users is essential for success. One effective way to do this is by adding scroll-over interactive elements to your WordPress site. These dynamic features not only make your site more visually appealing but also improve user interaction and experience.
In this detailed guide, we’ll walk you through everything you need to know about creating scroll-over interactive elements in WordPress, from simple hover effects to advanced animations and more.
Why You Should Care About Interactive Design in WordPress
With the increasing number of websites online, it’s crucial to make your site visually appealing, interactive, and engaging. Interactive website design has become one of the best ways to enhance the user experience and drive better performance on WordPress sites. Scroll-over interactive elements can give your site a modern, dynamic feel that keeps users engaged and encourages them to explore your content further.
What Are Scroll-Over Interactive Elements?
Scroll-over interactive elements are features that change or respond when a user scrolls or hovers over them. These can range from simple hover effects to advanced animations triggered by the user’s actions. Examples include:
- Scroll-Triggered Animations
Engage your visitors by animating elements as they scroll through your page. For example, text can fade in, images can zoom, or sections can slide into view. These animations not only grab attention but also guide users through your content seamlessly. - Hover Effects
Add interactivity to buttons, images, or links by changing their appearance when users hover over them. Examples include:- Buttons that grow larger or change color, encouraging clicks.
- Images that reveal additional details, captions, or effects like zoom-in or grayscale-to-color transitions.
- Parallax Scrolling
Create a sense of depth and sophistication by implementing parallax effects, where background images move at a slower pace than foreground elements. This technique adds a 3D feel and enhances storytelling, making your site visually captivating.
By thoughtfully integrating these features, you can ensure your website feels modern, interactive, and memorable, leaving a lasting impression on visitors.
The Importance of Scroll-Over Interactive Elements
Integrating interactive elements offers multiple benefits. Let’s look at why you should consider adding them to your WordPress site.
1. Enhanced User Experience
Adding interactive elements helps make the site more enjoyable to navigate, encouraging users to spend more time exploring.
2. Improved Visual Appeal
Interactive elements, like hover effects and animations, give your website a professional and polished look, improving its overall aesthetic appeal.
3. Increased Click-Through Rates
By using animations or hover effects, you can make call-to-action (CTA) buttons more noticeable, increasing the chances that users will click on them.
4. Better Information Hierarchy
Hover effects or scroll-triggered elements can reveal additional information without cluttering the page, ensuring a clean and organized layout.
5. Alignment with Modern Web Design Trends
Using scroll-based triggers and other advanced interactions helps your site stay up-to-date with current web design trends, ensuring it doesn’t feel outdated.
| Enhanced User Experience | Improves navigation and keeps users engaged longer. |
| Improved Visual Appeal | Adds professionalism and polish to the website design. |
| Increased Click-Through Rates | Enhances CTA visibility, encouraging more clicks. |
| Better Information Hierarchy | Reveals extra info without cluttering the page. |
| Alignment with Modern Trends | Keeps the website up-to-date with current web design standards. |
6. Grab People’s Attention
Interactive elements can make your website feel dynamic and exciting, grabbing the attention of your visitors and encouraging them to explore further.
7. Encourage Longer Engagement
The more interactive your website is, the more likely users will stay longer, reducing bounce rates and improving the overall user experience.
8. Highlight Key Content
Interactive effects allow you to draw attention to important content, such as promotions, services, or special announcements.
9. Increase Memorability
Interactive features, like animations, make your website more memorable, which can lead to repeat visits and stronger brand recall.
10. Support Accessibility Goals
By providing visual and interactive cues, these elements can make your website more accessible to a broader range of users, including those with disabilities.
| Grab Attention | Makes the site dynamic, encouraging visitors to explore. |
| Encourage Engagement | More interactivity leads to longer visits and reduced bounce rates. |
| Highlight Content | Draws attention to key content like promotions and announcements. |
| Increase Memorability | Animations make the site memorable, boosting brand recall. |
| Support Accessibility | Improves accessibility for users with disabilities. |
How to Create Scroll-Over Interactive Elements in WordPress
Here’s how to easily integrate interactive elements into your WordPress site.
1. Select the Right Theme or Page Builder
Choosing the right tools is crucial for seamlessly integrating interactive features like scroll-triggered animations, hover effects, and parallax scrolling into your WordPress site. Here’s a guide to assist you in making a well-informed decision:
- Elementor
Why Choose Elementor?
- A beginner-friendly drag-and-drop builder with an intuitive interface.
- Enables the creation of animations, hover interactions, and sophisticated design elements without the need for coding expertise.
- Comes with pre-built templates and widgets for interactive elements.
How to Get Started with Elementor:
- Install Elementor: Download the free version from the WordPress plugin repository or get Elementor Pro for more advanced features.
- Add Interactive Elements: Use built-in widgets like the “Scroll Animation” or “Hover Box” to create visually appealing effects.
- Customize Animations: Utilize the Motion Effects panel to add scrolling transitions, fade-ins, and parallax scrolling to specific sections.
- WPBakery Page Builder
Why Choose WPBakery?
- Highly flexible with advanced design controls for interactive elements.
- Includes built-in support for animations, hover effects, and customizable backgrounds.
- Compatible with most WordPress themes, ensuring design consistency.
How to Get Started with WPBakery:
- Install WPBakery: Purchase and install the plugin from its official site or through a bundled theme.
- Use Built-In Elements: Add interactive components like “Hover Flip Box” or animated progress bars directly from the WPBakery editor.
- Enhance Your Design: Pair with third-party add-ons for WPBakery to unlock even more interactive features like timeline animations or 3D transitions.
Practical Tips for Theme and Page Builder Selection
- Test Before Committing: Install free versions (if available) to ensure compatibility with your theme and assess ease of use.
- Prioritize Lightweight Themes: Interactive elements can slow down your site if the theme is bloated. Opt for themes like Astra, GeneratePress, or OceanWP, which are SEO optimized for speed.
- Check for Mobile Responsiveness: Ensure your chosen theme or builder supports mobile-friendly interactive designs. Test effects on different devices during development.
By selecting a theme or page builder that aligns with your skill level and project goals, you can efficiently create a WordPress site that is not only interactive but also professional and engaging.
2. Install Dedicated Plugins for Advanced Interactivity
To make your WordPress site more dynamic and engaging, you can use plugins specifically designed to add interactivity. Here’s how some top plugins can help and practical steps to use them:
- Scroll Triggered Animations
What It Does:
This type of plugin allows you to animate elements like text, images, or sections as users scroll down your page. Examples include fading in, sliding, or zooming effects.
Popular Plugin: Scrollsequence
How to Use:
- Install the Plugin: Download and activate Scrollsequence from the WordPress plugin repository.
- Create Animation Effects:
- Go to the plugin settings and select the page or section you want to animate.
- Add animations like fade-ins, slide-ins, or zoom effects to specific elements.
- Preview & Adjust: Use the preview feature to see how animations will look on your site, and fine-tune the speed and trigger points.
Pro Tip: Use animations sparingly to maintain site performance and avoid overwhelming your users.
- CSS Hero
What It Does:
CSS Hero lets you easily add hover effects and customize your site’s appearance without any coding. Change button colors, add hover animations, or apply effects to images and links directly from a visual interface.
How to Use:
- Install the Plugin: Purchase and activate CSS Hero from its official website.
- Launch the Customizer: Click on the CSS Hero icon in the WordPress admin bar to open the editor.
- Customize Hover Effects:
- Hover over elements like buttons or images in the live preview.
- Use the visual controls to adjust colors, sizes, or transitions when users hover over them.
- Apply & Save: Once satisfied, save your changes, and they’ll be live on your site.
Pro Tip: Test hover effects on mobile devices, as touchscreens don’t support hover states.
- Advanced Custom Fields (ACF)
What It Does:
ACF is a powerful plugin for adding custom fields to your site, enabling advanced interactions using JavaScript or other scripts. Perfect for developers looking for flexibility.
How to Use:
- Install the Plugin: Download and activate ACF from the WordPress plugin repository.
- Create Custom Fields:
- Navigate to the “Custom Fields” menu and create a new field group.
- Add fields like text, images, or scripts to define the interactive elements.
- Integrate JavaScript:
- Use the ACF fields in your template files to pass data into your custom JavaScript code.
- Add interactivity, such as tooltips, modal windows, or advanced animations, using your script.
- Preview & Test: Test your custom interactions on different browsers and devices to ensure functionality.
Pro Tip: Pair ACF with a theme builder like Elementor to create visually rich, interactive pages without sacrificing control.
General Tips for Using Plugins:
- Avoid Overloading Plugins: Excessive use of plugins can lead to slower website performance. Choose only those essential to your goals.
- Ensure Compatibility: Check that the plugin works seamlessly with your theme and other active plugins.
- Backup Before Changes: Always create a backup of your site before implementing new features.
By using these plugins, you can effortlessly add professional-grade interactive elements to your WordPress site, enhancing user engagement and overall functionality.
Interactive Plugins for WordPress
| Plugin | Description |
| Scroll Triggered Animations | Animates elements as users scroll (e.g., fade-ins, slides). |
| CSS Hero | Customize hover effects and appearance without coding. |
| Advanced Custom Fields (ACF) | Add custom fields for advanced interactivity using JavaScript. |
3. Add CSS for Hover Effects
Hover effects can significantly improve the user experience by providing subtle visual feedback when users interact with elements like buttons, links, or images. You can create these effects using simple CSS, and applying them is straightforward in WordPress.
Example of a Hover Effect in CSS
Here’s a basic example to change the background color of an element when a user hovers over it:
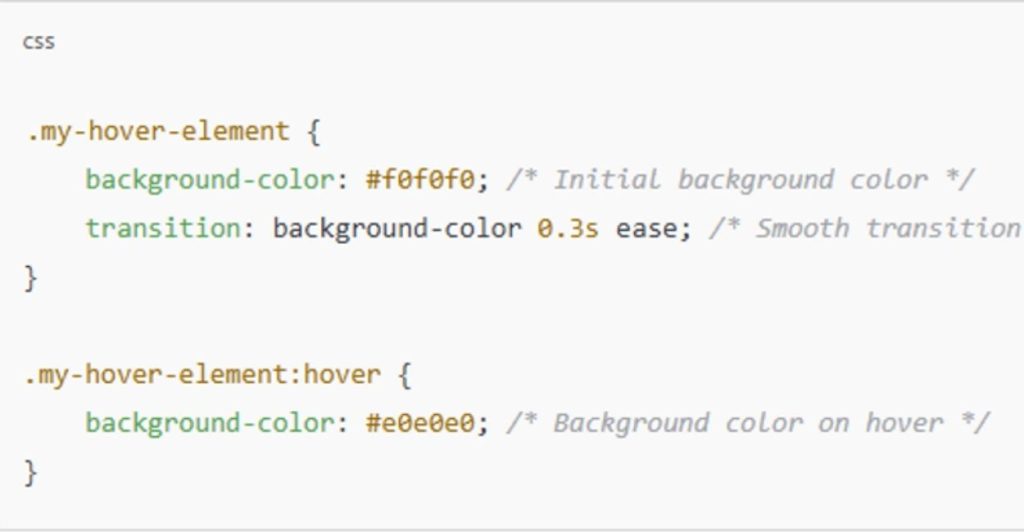
What This Does:
- background-color: Sets the initial background color and the color change on hover.
- transition: Adds a smooth transition effect when the hover state is triggered, improving the user experience.
- :hover: Targets the hover state of the element.
How to incorporate this CSS into your WordPress website
- Access the WordPress Customizer:
- Log in to your WordPress dashboard.
- Navigate to Appearance > Customize > Additional CSS.
- Add the CSS Code:
- Copy the CSS snippet above and paste it into the Additional CSS section.
- Replace .my-hover-element with the class or ID of the element you want to style (e.g., .button or #header-image).
- Publish Your Changes:
- Click Publish to save the CSS changes.
- Visit your site to see the hover effect in action.
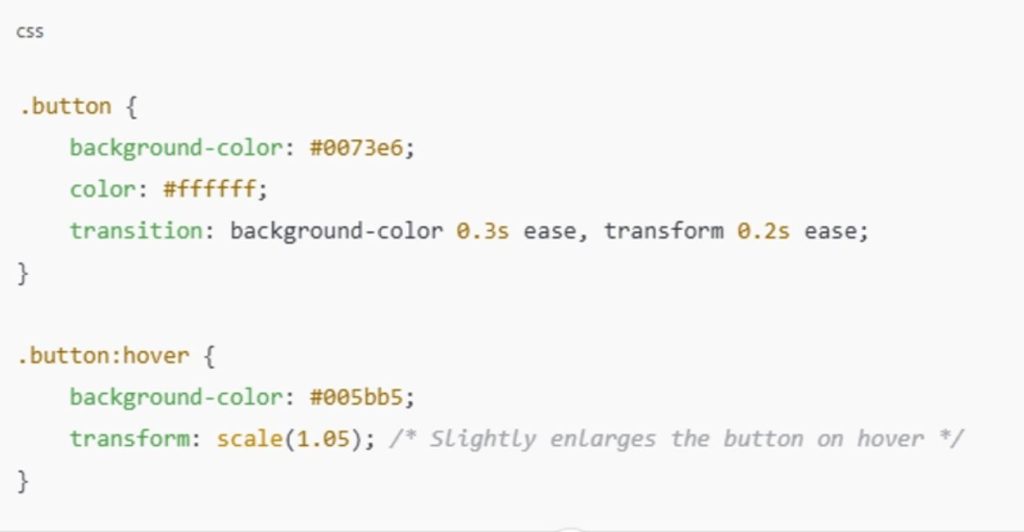
Practical Applications
- Buttons:
Use the hover effect to make buttons stand out when users interact with them:
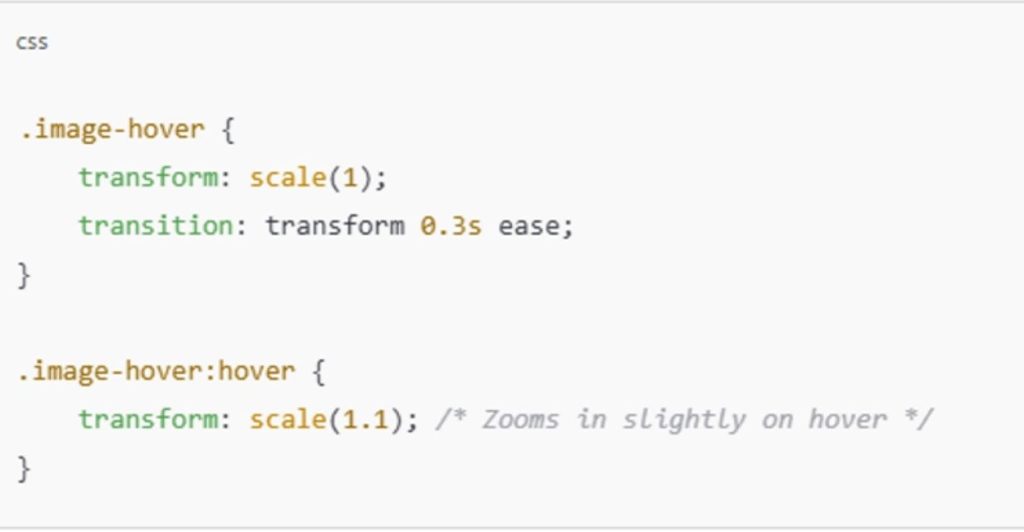
- Images:
Make images more engaging by adding a hover zoom effect:
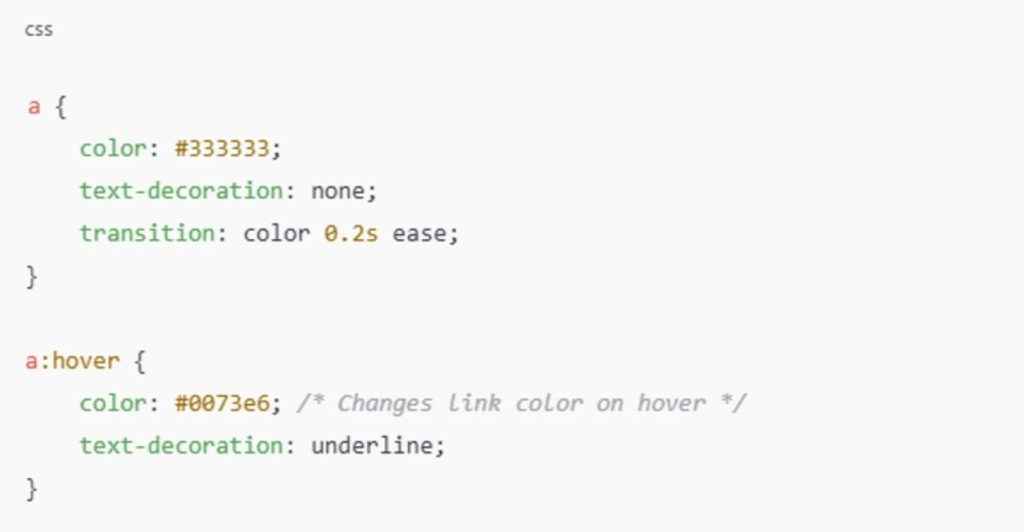
- Links:
Highlight links when hovered to improve navigation:
Tips for Using CSS Hover Effects Effectively
- Keep It Subtle: Avoid overly dramatic changes; subtle effects provide a professional feel.
- Test for Mobile Devices: Hover effects are primarily for desktop users since touchscreens don’t support hover states. Ensure fallback designs for mobile.
- Combine with Page Builders: If using tools like Elementor or WPBakery, you can further enhance CSS hover effects by adding animations or triggers directly within the builder.
By adding these simple CSS hover effects, you can create a more interactive and engaging user experience, helping your website stand out.
4. Use JavaScript or jQuery for Scroll Interactions
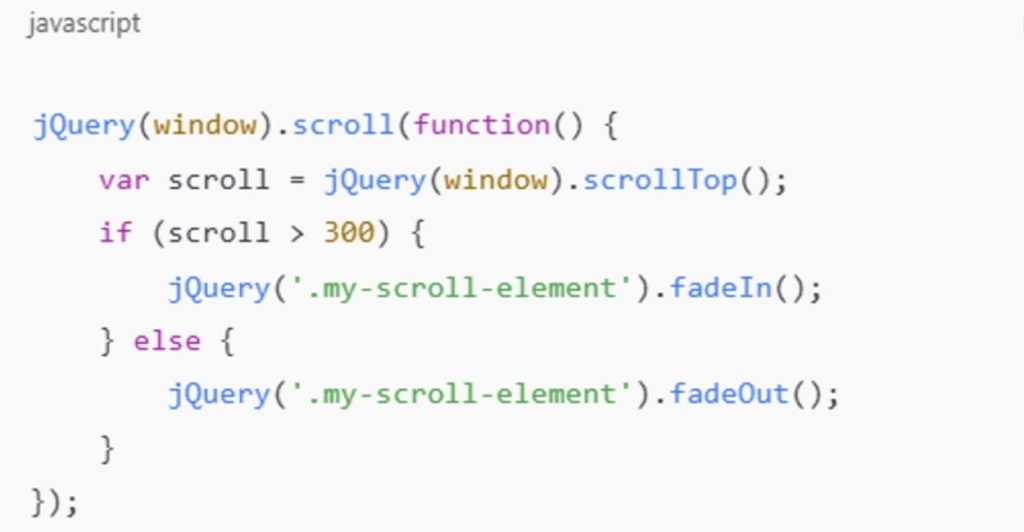
For more complex interactions, you can use JavaScript or jQuery. Here’s a basic example of a scroll-triggered animation:
This method is simple and doesn’t require editing theme files.
Steps to Add JavaScript:
- Install the Plugin
- Go to your WordPress dashboard.
- Navigate to Plugins > Add New and search for Insert Headers and Footers.
- Install and activate the plugin.
- Add Your Script
- Go to Settings > Insert Headers and Footers in your dashboard.
In the Footer Scripts section, paste the following code:
- Save Changes
- Click Save to apply the script to your site.
- Test Your Site
- Add an element with the class .my-scroll-element (e.g., a div or image) to your page.
- Test the scrolling effect on your live site to confirm it works.
Why Use This Method?
- No need to modify theme files.
- Changes are preserved even after theme updates.
- Easy to manage and edit scripts directly from the WordPress dashboard.
This approach is beginner-friendly and works seamlessly for adding custom JavaScript to your WordPress site.
5. Leverage Parallax Effects
Parallax effects add depth and interactivity to your site by making background images move at a different speed than foreground content. Here are two easy ways to achieve this in WordPress:
- Using Elementor Pro
Why Choose Elementor Pro?
Elementor Pro plugin includes built-in parallax features, making it simple to add dynamic scrolling effects without coding.
Steps to Create a Parallax Effect:
- Install Elementor Pro
- Purchase and install Elementor Pro from its official site.
- Edit a Page with Elementor
- Open the page you want to edit and click Edit with Elementor.
- Add a Section with a Background
- Create a new section or modify an existing one.
- In the Style tab, upload a background image.
- Enable Parallax Scrolling
- Go to the Advanced tab, then Motion Effects.
- Enable Scrolling Effects and adjust the Vertical Scroll to achieve the desired parallax motion.
- Preview and Publish
- Preview your design to ensure the effect works as expected, then click Publish.
- Using Parallax Scroll Plugin
Why Use Parallax Scroll?
This plugin simplifies adding parallax effects without requiring a premium page builder.
Steps to Create a Parallax Effect:
- Install Parallax Scroll Plugin
- Go to Plugins > Add New in your dashboard.
- Search for Parallax Scroll, install, and activate it.
- Create a Parallax Section
- Insert a new section or content block into your page.
- Configure the plugin settings to assign a background image and enable parallax effects.
- Customize the Effect
- Adjust parameters like speed, direction, and behavior directly in the plugin’s settings or via shortcodes provided by the plugin.
- Preview and Save
- Test the parallax effect in both desktop and mobile views, then save changes.
6. Test Responsiveness
Ensure your interactive elements work smoothly on all devices. Test on various screen sizes and touch devices to ensure a seamless experience.
7. Optimize for Performance
To prevent interactive elements from slowing down your website, consider the following tips:
- Use lightweight plugins.
- Avoid overloading the site with too many animations.
- Compress images and scripts to improve load times and SEO ranking.
8. Use Animation Libraries for Advanced Effects
Animation libraries like Animate.css and GSAP (GreenSock Animation Platform) allow you to add advanced effects like fades, slides, and scroll animations with minimal effort. Here’s how you can use them effectively in WordPress:
- Animate.css
What It Is:
Animate.css is a lightweight library with pre-defined animations like bounce, fade, and zoom effects.
How to Use Animate.css in WordPress:
- Install Animate.css:
- Use the Insert Headers and Footers plugin to include the Animate.css library via a link from its official website or a CDN.
- Apply Animations:
- Add Animate.css classes (e.g., “fade-in” or “bounce”) to elements like images, text, or buttons using a page builder like Elementor or Gutenberg.
- Customize:
- Combine classes to adjust delays or durations, which allows you to refine the effect timing.
Best For: Quick and straightforward animations like fading in images or making buttons bounce.
- GSAP (GreenSock Animation Platform)
What It Is:
GSAP is a powerful tool for creating custom animations, including scroll effects, timelines, and transitions.
How to Use GSAP in WordPress:
- Add GSAP to Your Site:
- Include GSAP via the Insert Headers and Footers plugin.
- Set Up Custom Animations:
- Use GSAP tools through a page builder or shortcode feature to create animations like scrolling effects or moving elements.
- Advanced Features:
- GSAP’s ScrollTrigger can animate elements based on the user’s scrolling behavior, allowing for highly interactive designs.
Best For: Custom animations and scroll-triggered effects that require flexibility.
Which One Should You Use?
- Use Animate.css for quick, easy animations without much customization.
- Use GSAP for advanced, highly tailored animations like scrolling effects or multi-step transitions.
Practical Tip: Start simple with pre-defined effects, then gradually explore GSAP for more advanced animations as your site grows. Both tools help make your WordPress site more dynamic and engaging without needing to write extensive code.
Animation Libraries for WordPress
| Library | Description |
| Animate.css |
|
| GSAP (GreenSock Animation Platform) |
|
9. Ensure Accessibility
When adding interactive elements, it’s crucial to ensure they are accessible to all users, including those with disabilities. Here’s how you can do this:
- Add ARIA labels to interactive elements so screen readers can understand them.
- Ensure that hover effects are keyboard-accessible, meaning users can interact with elements using the Tab key or other keyboard commands.
10. Use Conditional Logic
Plugins like Advanced Custom Fields (ACF) allow you to use conditional logic to display interactive elements based on certain user actions. For example, you can show different animations based on user scroll position or clicks.
11. Incorporate Scroll-Based Triggers
To trigger animations or reveal content as the user scrolls down, you can use libraries like ScrollMagic or plugins that allow you to integrate scroll-based triggers. These can be especially useful for creating immersive experiences as users explore your content.
Best Practices for Creating Scroll-Over Interactive Elements
Here are some best practices to ensure your interactive elements are effective and user-friendly:
- Maintain Consistency Across the Site: Use similar interactive features throughout the site to create a unified user experience.
- Prioritize Accessibility: Make sure all interactive elements are easy to navigate, especially for users with disabilities.
- Optimize for Speed: Use lightweight plugins and optimize images to maintain fast page load times.
- Provide Mobile-Friendly Alternatives: Ensure that mobile users have a smooth experience, as hover effects won’t work on mobile devices.
- Test Across Different Browsers and Devices: Ensure compatibility across various browsers and devices for a seamless user experience.
- Use Subtle Animations: Don’t overwhelm users with too many flashy effects. Subtle animations work best.
- Avoid Overloading with Effects: Too many interactive elements can distract users. Keep it balanced.
- Create Dynamic Scroll Effects: Use libraries like ScrollMagic for complex scroll-based animations.
- Add 3D Hover Effects: Incorporate 3D hover effects using libraries like Three.js for more immersive interactions.
- Integrate Sound Effects: Add subtle sound cues triggered by hover actions to engage users.
- Use Interactive Backgrounds: Let users interact with backgrounds that change or animate based on their scroll or hover actions.
- Implement Element Rotation on Hover: Add rotating elements on hover for a more dynamic interaction.
- Use Mouse Follow Effects: Create effects where elements follow the mouse, such as particles or light trails.
- Add Hover-Activated Videos: Display videos or animations when a user hovers over an element, making the site more engaging.
FAQ:
- What Are Scroll-Over Interactive Elements?
These are website elements that react or adjust based on user interaction, like scrolling or hovering, including animations, hover effects, and dynamic content. - Do I Need Coding Skills to Implement These Elements?
No, you don’t need coding skills. Page builders like Elementor or WPBakery and plugins like Scroll Triggered Animations make it easy to add interactive elements without coding. However, custom effects may require basic knowledge of CSS or JavaScript. - What Are the Best Plugins for Adding Scroll-Over Interactive Elements?
Well-known plugins such as Elementor, Scroll Triggered Animations, and CSS Hero enable you to effortlessly incorporate animations, hover effects, and other interactive features into your site. - Will Scroll-Over Interactive Elements Slow Down My Site?
If not optimized, they can. It’s important to use lightweight animations, optimize images, and minimize the number of plugins. Performance can be maintained by using efficient code and testing site speed. - How Do I Ensure Accessibility for Scroll-Over Interactive Elements?
Ensure that all interactive elements are keyboard accessible and provide ARIA labels for screen readers. Also, make sure hover effects can be triggered by clicks on mobile devices. - Can Scroll-Over Interactive Elements Improve SEO?
Yes, they can indirectly boost SEO by improving user engagement and reducing bounce rates. Engaged users spend more time on your site, which search engines like Google recognize. - What Are Parallax Effects and How Can They Enhance My Site?
Parallax effects create a 3D visual effect by moving background images at a different speed than the foreground. They add depth to your design, making your site feel more dynamic and engaging. - How Can I Test Scroll-Over Interactive Elements for Mobile Devices?
Evaluate the responsiveness by reviewing how elements behave on various screen sizes and devices. Ensure that hover effects function properly or provide alternatives, such as tap-based interactions for mobile users. - What Are the Key Benefits of Scroll-Over Interactive Elements?
These elements enhance user experience, improve visual appeal, increase engagement, highlight key content, and encourage users to explore your website more deeply. - Can I Combine Scroll-Over Effects with Other Animations?
Yes, combining effects like scroll-triggered animations with hover effects or parallax scrolling creates an even more engaging and visually appealing experience.
Case Study: Boosting User Engagement with Scroll-Over Interactive Elements
Background:
An online boutique selling handmade accessories sought to enhance its website’s user engagement and create a more interactive, visually appealing experience.
Objective:
To implement scroll-over interactive elements that would make the website feel dynamic and improve user interaction with the products.
Implementation:
- Theme and Page Builder: The website used a custom WordPress theme along with Elementor to add interactive elements without coding.
- Scroll Triggered Animations: Various product images and categories became visible as users scrolled, providing a dynamic feel to the site.
- Hover Effects: Hovering over product images zoomed them in slightly and revealed additional details like pricing and material.
- Parallax Scrolling: The homepage featured parallax scrolling, where background images moved slower than the foreground, creating depth.
Results:
- Increased User Engagement: Users spent 20% more time on the site due to the engaging interactive elements.
- Higher Conversion Rates: Product clicks increased by 10%, leading to higher sales.
- Lower Bounce Rates: Bounce rates decreased by 15% because visitors found the site more engaging and interactive.
By adding scroll-over interactive elements, the boutique achieved its goals of boosting engagement and improving sales. The site became more visually appealing, and the user experience was enhanced, leading to measurable business success.
Conclusion
Scroll-over interactive elements are an excellent way to create a more engaging and visually appealing WordPress site. By using hover effects, scroll-triggered animations, and advanced interactions with the help of plugins and animation libraries, you can create a dynamic and user-friendly experience that encourages visitors to stay longer and interact more. Remember to test for responsiveness, prioritize accessibility, and optimize for performance to ensure the best results.
Start implementing these interactive elements today and transform your WordPress site into an engaging and memorable experience for all users!
Resources:
- Books: “Designing Interfaces” by Jenifer Tidwell
- Online Platforms: CSS-Tricks, W3Schools, WordPress.org
CTA: Ready to boost your website’s engagement with interactive elements? Start implementing these strategies now and watch your user interaction soar!